SQL Tutorial for Business Analysts Part III

SQL tutorial for Business Analysts
This is the third and the concluding part of the SQL tutorial for business analysts. In the first part of this SQL tutorial for Business analysts, you learnt about the basics of a database system and SQL.
In the second part of this SQL tutorial for business analysts, you learnt about INSERT, DELETE and CREATE TABLE commands.
In this concluding part, you are going to learn about SELECT command.
Introduction to SELECT Command
SELECT command is probably the most used command in SQL. It’s used primarily to get data from a single table or multiple tables. The usage of SELECT command are as follows:
a) If you are a SQL developer, you may use it for creating reports or display data
b) If you are a Business Analyst or a testing professional, you may use SELECT to validate the data stored in the table(s) (to check if correct data is getting saved).
c) Business Analysts may also use it to get data for analysis
Syntax of SELECT command
The syntax of SELECT command is as shown below:
SELECT <<col_name1>>, <<col_name2>>…..
FROM <<table_1>>, <<table_2>>
WHERE <<conditions>> AND <<Joins>>
We will explain the syntax shortly but first of all, let’s see one example. We have been referring to STUDENTS table in this tutorial and we added rows to it as well. Let’s see, how can we fetch the data from that table.
Write the following command in the W3 SQL editor and hit “Run SQL” button:
SELECT * FROM STUDENTS;
The result of this command is as shown below:
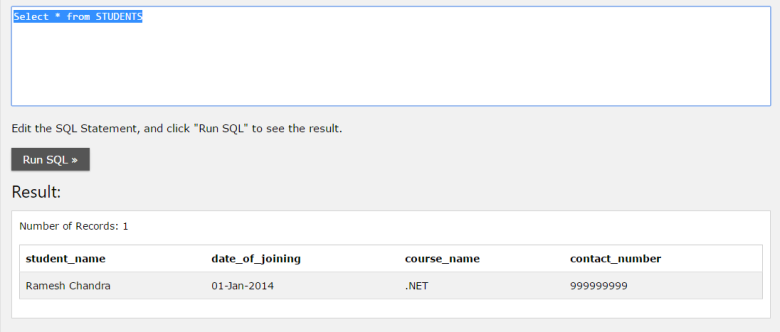
You can see that it returns all the rows (I had only inserted one row). If you have completed the exercise in the previous tutorial, it should return all the rows you had inserted.
Please note “*” in SELECT command is meant for showing all the columns and not for all the rows.
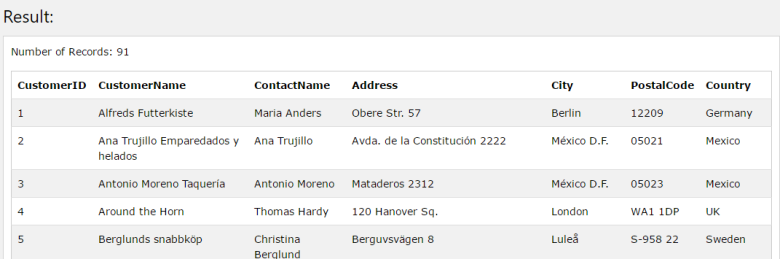
So what if there are multiple rows and we only want a specific row. Let’s take an example to understand that. There are multiple rows in the CUSTOMERS table in example database.
As of now, if I run the following command on CUSTOMERS table:
SELECT * FROM CUSTOMERS;
It returns 91 rows as shown below:
What if I want only specific row or rows? What should I do?
Using conditions in SELECT
That’s where the WHERE <<condition>> section comes into picture. So, let’s say we would like to see the customers who belong to “Berlin” (city name). So how will we write this SELECT?
SELECT * FROM CUSTOMERS
WHERE city = “Berlin”;
This SELECT statement will return you only those customers, which belong to “Berlin”. It’s also possible to have multiple conditions in a single SELECT statement.
The table contains multiple Customers from the USA. As of now, there are 13 customers from the USA. But if we only want to know about the customers from the city “Seattle” in the USA, we can write the SELECT statement as shown below:
SELECT * FROM CUSTOMERS
WHERE country=”USA”
AND city = “Seattle”
This will get only those customers, which are from “Seattle” in the USA. You can have as many conditions in the SELECT statement.
Practice Exercises
You can use the tables provided in SQL editor to practice.
Joins in SELECT Command
In the last section of this three part SQL tutorial, we are going to discuss about JOINS. JOINS are used if we would like to get data from more than one table.
In that case, we need to create the join on the columns, which are common between the tables.
We have already seen the syntax in this post. Let’s look at our example case. In the sample database given in W3 SQL editor, let’s look at PRODUCTS and CATEGORIES tables.
If you see the data in the PRODUCTS table, you can see that products belong to various categories and these categories are stored in the PRODUCTS table as CategoryID.
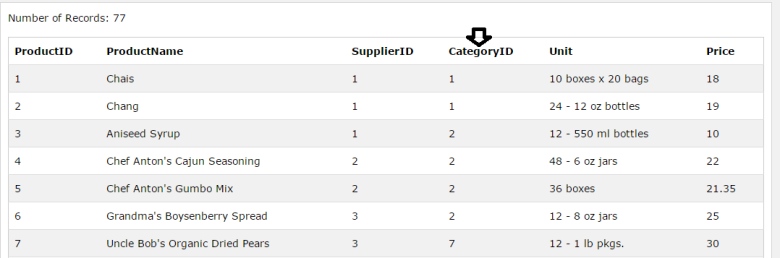
This CategoryID is actually a column in the CATEGORIES table. If we try to get the data from CATEGORIES table, we will get the data with CATEGORYID as 1, 2 etc.
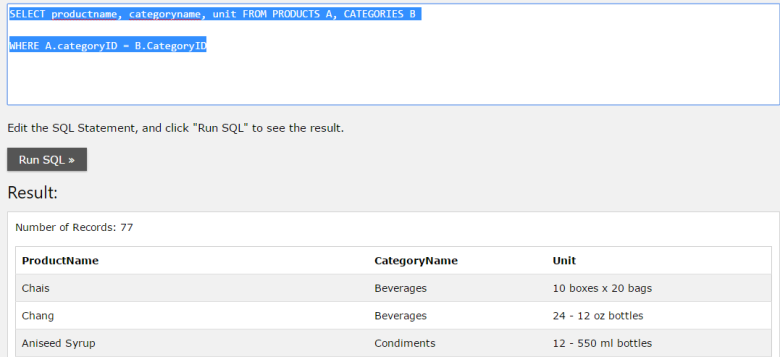
But that’s not very easy to understand, what if we would like to see the proper Category name along with the product names and unit. Let’s see how to write the SELECT command in this case.
SELECT productname, categoryname, unit FROM PRODUCTS A, CATEGORIES B
WHERE A.categoryID = B.CategoryID
As a result, we will get the following result:
We have used A & B immediately after the table names for convenience. These are also known as aliases. The join is created using the following line:
A.categoryID = B.CategoryID
Since CategoryID is the common column name, we have equated them to avoid Cartesian product (Remember Set theory?).
If there are more than one common columns between the tables, you should equate all of them, else you will get wrong results.
Summing up SQL Tutorial
You have learnt basic commands of SQL in this tutorial, there are many commands as discussed in Part-I of this SQL tutorial.
To get a stronger grip on the SQL command, you need to practice a lot more . This is an important skill, expected from a Business Analyst in the job interviews.
We are coming up with a more comprehensive tutorial for learning Business Analysis skills . That tutorial will provide steps to learn the business analyst skills with specific resources including videos and tutorials.
You may also like to look at our other tutorials and videos, specially for professionals, who are looking to become a business analyst.

Finally, SQL is an important skill for Business Analysts specially if you are looking to become a business analyst.
Techcanvass conducts ECBA Training, to know more about it you can click on the following image.